by Roderick W. Smith, rodsmith@rodsbooks.com
Originally written: 3/14/2012; last Web page update: 1/26/2016, referencing rEFInd 0.10.2
This Web page is provided free of charge and with no annoying outside ads; however, I did take time to prepare it, and Web hosting does cost money. If you find this Web page useful, please consider making a small donation to help keep this site up and running. Thanks!
| Donate $1.00 | Donate $2.50 | Donate $5.00 | Donate $10.00 | Donate $20.00 | Donate another value |
This page is part of the documentation for the rEFInd boot manager. If a Web search has brought you here, you may want to start at the main page.
For the most part, rEFInd is easy to use; just use your keyboard's arrow keys to select the OS you want to boot or the utility you want to launch and press the Enter key. A few details aren't entirely intuitive, though, so this page describes them.
With rEFInd in place and added to your firmware's list of boot utilities, you can reboot your computer. Depending on your configuration, rEFInd may come up immediately or you may need to select it from your firmware's boot options or reconfigure your firmware to present rEFInd automatically. Unfortunately, I can't offer much specific advice on this score, since EFI implementations differ so much in their user interfaces.
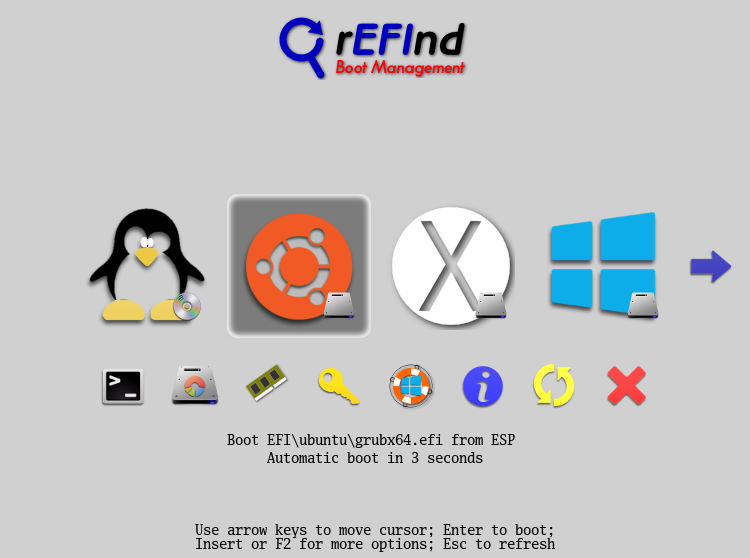
Assuming rEFInd starts up correctly, you should see its main screen, which resembles the following:
If you don't press a key before the timeout expires, the default boot loader will launch. (The timeout is shown beneath the description line until you press a key.) This is normally the item that you launched the last time rEFInd ran, but you can adjust the default by editing the configuration file. (In this example, it's the Ubuntu Linux loader, which is further identified by text as EFI\ubuntu\grubx64.efi from ESP.)
This display is dominated by the central set of OS tags (icons), which in this example includes tags for an unknown Linux distribution, Ubuntu, OS X, and Windows. All but the first of these are on hard disks, but the unknown Linux boot loader is on an optical disc, as revealed by the small icons (known as badges) in the lower-right corner of the OS icons.
In this example, the Ubuntu tag is selected. You can move the selection left by pressing the left arrow key and right by pressing the right arrow key. If your system has many boot loaders, an arrow icon will appear to the right and/or left of the boot loader list, indicating that the boot loader list will scroll when you move off the edge. (Such an arrow is visible to the right in the sample screen.) You can scroll the list by one line full of icons by using the Page Up or Page Down keys to move left and right, respectively. Moving past the final selection or using the down arrow key moves the selection to the second row of small tags, which launch ancillary programs or perform special actions. If you've moved the selection cursor to the second row, pressing the up arrow key or scrolling past the left edge of the second row moves the cursor to the top row. In this figure, these eight tags are present:
By default, the options to display an information page, shutdown the computer, and reboot the computer are present. Options to launch a shell, launch gdisk, launch a memory test utility, launch the Apple recovery utility, launch the Windows recovery utility, and launch a Secure Boot key management utility will also appear automatically if these utilities are installed. A tag to reboot into the firmware appears if your firmware supports this feature. Options to launch the hybrid MBR tool (gptsync) and to exit from rEFInd are not displayed by default; you must edit the configuration file to enable these features, or to disable those that are displayed by default if you don't want them.
To launch an OS or utility, you should select its tag and then press the Enter key or the space bar.
Ordinarily, rEFInd displays tags for OSes it finds on internal hard disks, external hard disks (including USB flash drives, CF disks, and so on), and optical discs. Sometimes, though, the firmware hasn't had time to fully examine these devices by the time rEFInd starts; or you might only insert or plug in the media after rEFInd appears. In these cases, you can press the Esc key to have rEFInd re-read its configuration file and re-scan your media for boot loaders. This action can take a few seconds to complete, so be patient. You can also use this feature to detect OSes if you launch a shell and use it to load a driver or edit the refind.conf file. If you regularly need to press Esc, you might look into the scan_delay configuration file option, described on the Configuring the Boot Manager page.
On some computers, the firmware doesn't mount external USB media unless you adjust a firmware option or use the EFI's own boot manager prior to launching rEFInd. If you don't see external media appear in rEFInd's list, consult your computer's manual or examine its firmware to locate a relevant option. This option is often called fast boot or something similar; when enabled, the computer doesn't activate most USB devices because doing so takes a second or two.
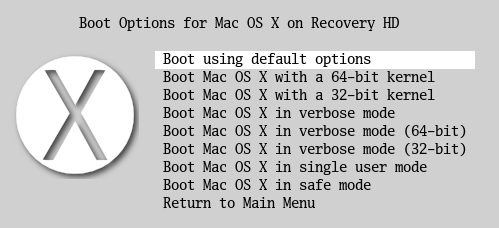
If you press the Insert, F2, or + key, rEFInd will show a menu that may hold additional options, depending on the OS type. (OS X and Linux are most likely to hold interesting options on their submenus.) The following figure shows the submenu for Mac OS X. You can use this menu much like the main menu; move the cursor to select the option you want to use, then press the Enter key to launch the boot loader with the selected options. Press the Esc key or select Return to Main Menu to return to the main menu. (See the Methods of Booting Linux page for information on what you might see on a Linux submenu page.)
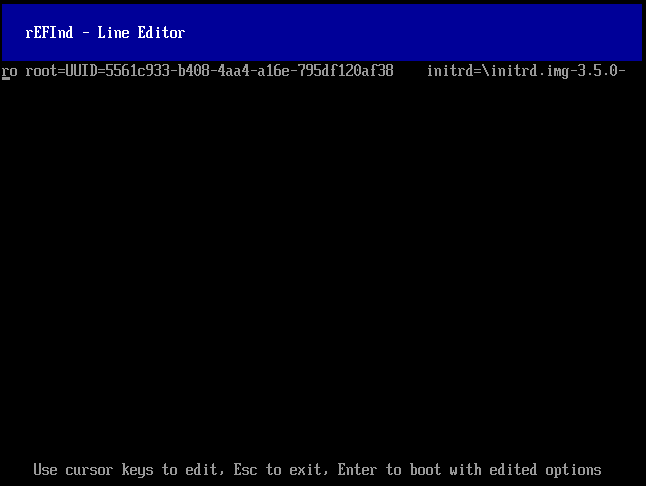
From the options submenu, you can press the Insert, F2, or + key again to edit your boot loader options. You're most likely to want to do this when booting Linux via its EFI stub loader, since you can then enter arbitrary kernel options. A simple text-mode line editor opens (shown below), enabling you to move a cursor back and forth in the line with your arrow keys, delete text, and type in new text. If you want to boot with your edited options, press the Enter key. If you decide you picked the wrong entry, press the Esc key. Note that long option lists, as shown in the figure, scroll off the edge of the screen. Moving the cursor past the screen edge scrolls the entire line of text.
If your computer supports Secure Boot, you may find that some of your OSes and tools won't work; they'll produce Secure Boot validation failure error messages. You can overcome this problem by creating a signing key, signing your binaries with it, and adding the public version of that key to your machine owner key (MOK) list. This process is described on the Managing Secure Boot page.
Although most rEFInd features can be activated via fairly obvious keyboard actions, some are not obvious. Table 1 summarizes the keystrokes that rEFInd accepts, and the action that each keystroke invokes.
| Keystroke | Explanation |
|---|---|
| left arrow | Moves the selection one icon to the left (or up the list in text mode) |
| right arrow | Moves the selection one icon to the right (or down the list in text mode) |
| up arrow | Moves the selection from the utilities row to the OS row (in text mode, moves up one entry) |
| down arrow | Moves the selection from the OS row to the utilities row (in text mode, moves down one entry) |
| Page Up | Scrolls the visible set of tags to the left (or up in text mode) |
| Page Down | Scrolls the visible set of tags to the right (or down in text mode) |
| Home | Moves the selection to the first item on the OS row |
| End | Moves the selection to the last item on the utilities row |
| Esc | Returns from a sub-menu; on the main screen, re-reads the configuration file and re-scans for boot loaders |
| Insert, F2, or + | From the main menu, opens the selection's submenu, which is most useful with Mac OS X, ELILO, and Linux kernels with EFI stub loader support; in a submenu, opens a line editor enabling editing of boot options |
| F10 | Saves an image of the current screen in the file screenshot_###.bmp, where ### is a sequence number starting with 001, in the EFI System Partition's (ESP's) root directory |
| F12 or (on some keyboards) Eject | Ejects removable media. This feature only works on some Macs, not on UEFI-based PCs. |
| Enter or spacebar | Launches the currently-selected OS, utility, or built-in feature |
| 1 through 9 | Launches the specified boot loader by number |
| A | Displays the "About rEFInd" information |
| E | Launches the first instance of ELILO in the boot list |
| G | Launches the first instance of GRUB in the boot list |
| L | Launches the first Linux kernel in the boot list |
| M | Launches the first Mac OS boot loader in the boot list |
| P | Launches gptsync |
| S | Launches an EFI shell, if available |
| U | Shuts down the computer (but note that this is buggy and reboots most UEFI-based PCs) |
| W | Launches the first Windows boot loader |
| Other letters | Launch OSes whose names begin with those letters, as described below |
rEFInd assigns shortcut letters to most OS entries based on the first letter of the directory in which the OS's boot loader is stored. For instance, if you have a boot loader called /EFI/debian/elilo.efi, rEFInd attempts to assign it a shortcut letter of D. rEFInd overrides this default for Mac OS X, Windows, and for Linux's GRUB, ELILO, and EFI stub boot loaders if the distribution can't be more precisely identified, as noted in the preceding table. This method works well for many installations, but it can produce conflicts. For instance, if you have a Macintosh that holds both Mac OS X and Mandriva, both OSes would normally use the M shortcut key. In practice, which works depends on the order in which rEFInd detects the OSes.
Sometimes it's necessary to boot a legacy (BIOS-based) OS on an EFI computer. This is especially true on Macs, since this has been the usual method of dual-booting OS X and Windows. (Since the release of Windows 8, though, booting Windows in EFI mode on Macs has become both more practical and more common.) In the past, many Linux distributions installed more easily in BIOS mode on Macs, but many Linux distributions now favor native EFI-mode installation on Macs. (See my EFI-Booting Ubuntu on a Mac page for an in-depth look at this topic.)
On UEFI-based PCs, booting some OSes in EFI mode and others in BIOS mode is less often necessary, since it's usually easy to install all your OSes in BIOS mode. If you have a working EFI-mode OS installation, though, and if you want to install an OS that lacks EFI-mode boot support, you may need to boot in both modes. Most of the BSDs (FreeBSD being a notable exception), Haiku, DOS, Windows XP and earlier, and many more obscure OSes still lack EFI support and so must be booted in BIOS mode. You might also want to boot a BIOS-mode emergency recovery CD, such as Parted Magic or System Rescue CD. Note, however, that EFI-mode support is being added to OSes. It's possible that some of those I've mentioned here will support EFI-mode booting by the time you read this!
To help out when you need to boot in BIOS mode, rEFInd supports booting legacy OSes; however, the details vary between Macs and UEFI PCs. Also, be aware that some UEFI PCs lack the Compatibility Support Module (CSM) that's required for this feature to work. This is true even of some computers that can boot BIOS-based OSes natively. This can happen because the firmware is basically a BIOS with a UEFI implementation tacked on top of it; such systems rely on the native BIOS to boot, and may not provide a way for EFI applications to access the BIOS features via CSM mechanisms. If you have such a computer and if you enable a legacy boot option in the configuration file, rEFInd notifies you of its inability to present legacy boot options when it starts up.
The scanfor option, described on the Configuring the Boot Manager page, controls rEFInd's detection of legacy OSes. On Macs, the default is to scan for such OSes, since a common boot scenario on Macs is dual-booting OS X and Windows, and of course BIOS support is required for this. On UEFI PCs, rEFInd defaults to not scanning for legacy OSes; thus, you must edit the scanfor item in the configuration file if you want to boot a legacy OS on a UEFI PC.

On Macs, rEFInd uses a flexible scanning algorithm inherited from rEFIt. This procedure detects most legacy OSes on most disks, although it can sometimes miss an OS. This scanning algorithm can often identify the legacy OS you've installed and present a suitable icon. On UEFI PCs, rEFInd relies on the computer's NVRAM settings to determine which legacy boot loaders to scan, but rEFInd does tell the firmware to find every BIOS-mode boot option and add it to its NVRAM list. On most UEFI PCs, at least one hard disk and your optical drive appear as options. On one computer I tested (a Lenovo laptop), the internal hard disk appears in the rEFInd menu as a removable disk. If you have multiple hard disks, you may need to uncomment the uefi_deep_legacy_scan option to get entries for booting all of your disks. If you opt to scan for BIOS-mode optical disks (scanfor cd) on UEFI-based PCs, an icon will appear whether or not your drive holds a CD. The UEFI scanning procedure is also incapable of detecting the OS type, so you'll see a generic legacy OS icon, as shown at the right.
On both PCs and Macs, if you see non-functional legacy boot options, you can remove them by using the dont_scan_volumes token in refind.conf: Add any substring from the description that appears when you highlight the non-functional option to the set of options to have rEFInd ignore that entry. (Note that you must provide a complete volume name when excluding EFI volumes from scanning. The legacy-mode exclusion operation is more flexible in this regard.)
You may discover that rEFInd takes a while to appear on the screen compared to other boot managers and boot loaders. Ultimately, the reason is that rEFInd is doing more—it's reading more filesystems, scanning for bootable files, and so on. In most cases, rEFInd takes just a second or two longer than other boot loaders, but I've heard of (and seen) much longer delays on computers that are configured sub-optimally. Some things you can do to reduce these delays include:
I hope these tips will help you to overcome any speed problems you're experiencing. As I said, rEFInd is reasonably fast on many computers, so you might not run into problems in the first place. If you do, though, reducing rEFInd's workload can help.
copyright © 2012–2016 by Roderick W. Smith
This document is licensed under the terms of the GNU Free Documentation License (FDL), version 1.3.
If you have problems with or comments about this Web page, please e-mail me at rodsmith@rodsbooks.com. Thanks.
Return to my main Web page.