by Roderick W. Smith, rodsmith@rodsbooks.com
Originally written: 3/14/2012; last Web page update: 2/1/2014, referencing rEFInd 0.8.5
This Web page is provided free of charge and with no annoying outside ads; however, I did take time to prepare it, and Web hosting does cost money. If you find this Web page useful, please consider making a small donation to help keep this site up and running. Thanks!
| Donate $1.00 | Donate $2.50 | Donate $5.00 | Donate $10.00 | Donate $20.00 | Donate another value |
This page is part of the documentation for the rEFInd boot manager. If a Web search has brought you here, you may want to start at the main page.
Don't be scared by the length of this page! Only portions of this page apply to any given user, and most people can install rEFInd from an RPM or Debian package in a matter of seconds or by using the install.sh script in minute or two.
Once you've obtained a rEFInd binary file, you must install it to your computer's EFI System Partition (ESP) (or conceivably to some other location). The details of how you do this depend on your OS and your computer (UEFI-based PC vs. Macintosh). The upcoming sections provide details. See the Contents sidebar to the left for links to specific installation procedures. For most Linux users, an RPM or Debian package is the best way to go. If your Linux system doesn't support these formats, though, or if you're running OS X, using the install.sh script can be a good way to go. If you're using Windows, you'll have to install manually.
I provide RPM and Debian package files for rEFInd; and starting with version 0.8.1, I'm maintaining an Ubuntu PPA for rEFInd. If you have a working RPM-based or Debian-based Linux installation that boots in EFI mode, using one of these files is likely to be the easiest way to install rEFInd: You need only download the file and issue an appropriate installation command. In some cases, double-clicking the package in your file manager will install it. If that doesn't work, a command like the following will install the RPM on an RPM-based system:
# rpm -Uvh refind-0.8.4-1.x86_64.rpm
On a Debian-based system, the equivalent command is:
# dpkg -i refind_0.8.4-1_amd64.deb
Either command produces output similar to that described for using the install.sh script, so you can check it for error messages and other signs of trouble. The package file installs rEFInd and registers it with the EFI to be the default boot loader. The script that runs as part of the installation process tries to determine if you're using Secure Boot, and if so it will try to configure rEFInd to launch using shim; however, this won't work correctly on all systems. Ubuntu 12.10 users who are booting with Secure Boot active should be wary, since the resulting installation will probably try to use Ubuntu's version of shim, which won't work correctly with rEFInd. The shim program provided with more recent versions of Ubuntu should work correctly.
If you're using Ubuntu, you should be able to install the PPA as follows:
$ sudo apt-add-repository ppa:rodsmith/refind
$ sudo apt-get update
$ sudo apt-get install refind
The PPA version will update automatically with your other software, which you might or might not want to have happen. It's also built with GNU-EFI rather than with TianoCore. This last detail should have no practical effects, but it might be important if you've got a buggy EFI or if there's some undiscovered rEFInd bug that interacts with the build environment.
Since version 0.6.3, the installation script makes an attempt to install rEFInd in a bootable way even if you run the script from a BIOS-mode boot, and therefore the RPM and Debian packages do the same. I cannot guarantee that this will work, though, and even if it does, some of the tricks that install.sh uses might not persist for long. You might therefore want to use mvrefind.sh to move your rEFInd installation to another name after you boot Linux for the first time from rEFInd.
Since version 0.6.2-2, my package files have installed the rEFInd binaries to /usr/share/refind-version, the documentation to /usr/share/doc/refind-version, and a few miscellaneous files elsewhere. (The PPA package omits the version number from the file paths.) Upon installation, the package runs the install.sh script to copy the files to the ESP. This enables you to re-install rEFInd after the fact by running install.sh, should some other tool or OS wipe the ESP or should the installation go awry. In such cases you can use install.sh or install manually.
If you're using Linux or Mac OS X, the easiest way to install rEFInd is to use the install.sh script. This script automatically copies rEFInd's files to your ESP or other target location and makes changes to your firmware's NVRAM settings so that rEFInd will start the next time you boot. If you've booted to OS X or in non-Secure-Boot EFI mode to Linux on a UEFI-based PC, install.sh will probably do the right thing, so you can get by with the quick instructions. If your setup is unusual, if your computer uses Secure Boot, or if you want to create a USB flash drive with rEFInd on it, you should read the extra instructions for this utility.
By default, the install.sh script installs rEFInd to your disk's ESP. Under Mac OS X, you can instead install rEFInd to your current OS X boot partition by passing the script the --notesp option, or to a non-boot HFS+ partition by using the --ownhfs devicefile option. Under either OS, you can install to something other than the currently-running OS by using the --root /mountpoint option. (See Table 1 for details.)
Under Linux, install.sh will be most reliable if your ESP is already mounted at /boot or /boot/efi, as described in more detail in the Installing rEFInd Manually Using Linux section. (If you installed Linux in EFI mode, chances are your ESP is properly mounted.) If your ESP is not so mounted, install.sh will attempt to locate and mount an ESP, but this action is not guaranteed to work correctly. If you run install.sh from a BIOS/legacy-mode boot, particularly on a computer that also runs Windows, you should be aware that the tricks the script uses to install itself from BIOS mode are rather delicate. You can convert to a more conventional configuration using the mvrefind.sh script after you've booted in EFI mode.
Prior to version 0.8.4, install.sh installed rEFInd to the OS X root partition by default. I changed this because the default configuration for OS X 10.10 ("Yosemite") makes this placement unusable. Instead, install.sh now installs to the ESP under OS X, just as it does under Linux. If you're upgrading a working install of rEFInd to the OS X root partition, it's best to pass the --notesp option to install.sh. This option is described in more detail shortly.
A sample run under Linux looks something like this:
# ./install.sh
Installing rEFInd on Linux....
ESP was found at /boot/efi using vfat
Installing driver for ext4 (ext4_x64.efi)
Copied rEFInd binary files

Copying sample configuration file as refind.conf; edit this file to configure
rEFInd.


Installation has completed successfully.
The output under OS X is a bit different:
$ ./install.sh
Not running as root; attempting to elevate privileges via sudo....
Password:
Installing rEFInd on OS X....
Installing rEFInd to the partition mounted at /Volumes/ESP
Found suspected Linux partition(s); installing ext4fs driver.
Installing driver for ext4 (ext4_ia32.efi)
Copied rEFInd binary files

Copying sample configuration file as refind.conf; edit this file to configure
rEFInd.


WARNING: If you have an Advanced Format disk, *DO NOT* attempt to check the
bless status with 'bless --info', since this is known to cause disk corruption
on some systems!!


Installation has completed successfully.

Unmounting install dir
In either case, the details of the output differ depending on your existing configuration and how you ran the program. Unless you see an obvious warning or error, you shouldn't be concerned about minor deviations from these examples. If you run into such a situation, or if you want to install in an unusual way, read on....
Note that the change to an ESP location for rEFInd with version 0.8.4 means that, if you upgrade rEFInd from an earlier version, you may notice a rEFInd boot option in the rEFInd menu. This option will boot the old version of rEFInd (or the new one, if something went wrong and the old version continues to boot). You can rid yourself of the unwanted boot menu by deleting the old files or by using dont_scan_dirs or dont_scan_files in refind.conf. Before you do this, you should use rEFInd to identify the unwanted files—the filename and volume identifier appear under the icons when you highlight the option. You can then locate and delete them from within OS X. Before you delete the old files, though, you may want to copy over any changes you've made to the rEFInd configuration, icons, and other support files.
Some details that can affect how the script runs include the following:
In addition to these quirks, you should be aware of some options that install.sh supports to enable you to customize your installation in various ways. The syntax for install.sh is as follows:
install.sh [--notesp | --usedefault device-file | --root mount-point | \
            --ownhfs device-file ] \
           [--nodrivers | --alldrivers] [--shim shim-filename] [--localkeys] [--yes]
The details of the options are summarized in Table 1. Broadly speaking, they come in four classes: installation location options (--notesp, --usedefault, and --root), driver options (--nodrivers and --alldrivers), Secure Boot options (--shim and --localkeys), and a user input option (--yes). Using some of these options in unusual conditions can generate warnings and prompts to confirm your actions. In particular, using --shim or --localkeys when you're not booted in Secure Boot mode, or failing to use --shim when you are booted in Secure Boot mode, will generate a query and a request to confirm your installation. Consult the Managing Secure Boot page for more on this topic.
| Option | Explanation |
|---|---|
| --notesp | This option, which is valid only under OS X, tells install.sh to install rEFInd to the OS X root partition rather than to the ESP. This behavior was the default in rEFInd 0.8.3 and earlier, so you may want to use it when upgrading installations of that version, unless you used --esp (which is now the default behavior, although the --esp option no longer exists) or --ownhfs. You may also want to use --notesp on new installations if you're sure you're not using whole-disk encryption or logical volumes. |
| --usedefault device-file | You can install rEFInd to a disk using the default/fallback filename of EFI/BOOT/bootx64.efi (and EFI/BOOT/bootia32.efi, if the 32-bit build is available) using this option. The device-file should be an unmounted ESP, or at least a FAT partition, as in --usedefault /dev/sdc1. Your computer's NVRAM entries will not be modified when installing in this way. The intent is that you can create a bootable USB flash drive or install rEFInd on a computer that tends to "forget" its NVRAM settings with this option. This option is mutually exclusive with --notesp and --root. |
| --ownhfs device-file | This option should be used only under OS X. It's used to install rEFInd to an HFS+ volume other than a standard Mac boot volume. The result should be that rEFInd will show up in the Mac's own boot manager. More importantly, suspend-to-RAM operations may work correctly. Note that this option requires an HFS+ volume that is not currently an OS X boot volume. This can be a data volume or a dedicated rEFInd partition. The ESP might also work, if it's converted to use HFS+. |
| --root /mount-point | This option is intended to help install rEFInd from a "live CD" or other emergency system. To use it, you should mount your regular installation at /mount-point, including your /boot directory (if it's separate) at /mount-point/boot and (on Linux) your ESP at that location or at /mount-point/boot/efi. The install.sh script then installs rEFInd to the appropriate location—on Linux, /mount-point/boot/EFI/refind or /mount-point/boot/efi/EFI/refind, depending on where you've mounted your ESP. Under OS X, this option is only useful in conjunction with --notesp, in which case rEFInd will install to /mount-point/EFI/refind. The script also adds an entry to your NVRAM for rEFInd at this location. You cannot use this option with --usedefault. Note that this option is not needed when doing a dual-boot Linux/OS X installation; just install normally in OS X. |
| --nodrivers | Ordinarily install.sh attempts to install the driver required to read /boot on Linux. This attempt works only if you're using ext2fs, ext3fs, ext4fs, or ReiserFS on the relevant partition. If you want to forego this driver installation, pass the --nodrivers option. This option is the implicit when you use --usedefault. |
| --alldrivers | When you specify this option, install.sh copies all the driver files for your architecture. You may want to remove unused driver files after you use this option, especially if your computer uses Secure Boot. Note that some computers hang or fail to work with any drivers if you use this option, so use it with caution. |
| --shim shim-filename or --preloader preloader-filename | If you pass this option to install.sh, the script will copy the specified shim program file to the target directory, copy the MokManager.efi file from the shim program file's directory to the target directory, copy the 64-bit version of rEFInd as grubx64.efi, and register shim with the firmware. (If you also specify --usedefault, the NVRAM registration is skipped.) When the target file is identified as PreLoader, much the same thing happens, but install.sh copies HashTool.efi instead of MokManager.efi and copies rEFInd as loader.efi rather than as grubx64.efi. The intent is to simplify rEFInd installation on a computer that uses Secure Boot; when so set up, rEFInd will boot in Secure Boot mode, with one caveat: The first time you boot, MokManager/HashTool will launch, and you must use it to locate and install a public key or register rEFInd as a trusted application. The rEFInd public key file will be located in the rEFInd directory's keys subdirectory under the name refind.cer. Note that I'm not providing a shim binary myself, but you can download one from here. Some distributions also provide their own shim programs, so can point to them—for instance, in /boot/efi/EFI/fedora/shim.efi. |
| --localkeys | This option tells install.sh to generate a new Machine Owner Key (MOK), store it in /etc/refind.d/keys as refind_local.*, and re-sign all the 64-bit rEFInd binaries with this key before installing them. This is the preferable way to install rEFInd in Secure Boot mode, since it means your binaries will be signed locally rather than with my own key, which is used to sign many other users' binaries; however, this method requires that both the openssl and sbsign binaries be installed. The former is readily available in most distributions' repositories, but the latter is not, so this option is not the default. |
| --yes | This option causes the script to assume a Y input to every yes/no prompt that can be generated under certain conditions, such as if you specify --shim but install.sh detects no evidence of a Secure Boot installation. This option is intended mainly for use by scripts such as those that might be used as part of an installation via an RPM or Debian package. |
After you run install.sh, you should peruse the script's output to ensure that everything looks OK. install.sh displays error messages when it encounters errors, such as if the ESP is mounted read-only or if you run out of disk space. You may need to correct such problems manually and re-run the script. In some cases you may need to fall back on manual installation, which gives you better control over details such as which partition to use for installation.
Sometimes the install.sh script just won't do the job, or you may need to install using an OS that it doesn't support, such as Windows. In these cases, you'll have to install rEFInd the old-fashioned way, using file-copying commands and utilities to add the program to your EFI's boot loader list. I describe how to do this with Linux, OS X, Windows, and the EFI shell.
On a UEFI-based PC, you'll normally install rEFInd to the ESP, which is usually mounted at /boot/efi. You can verify that this is the case by using the df command:
$ df /boot/efi
Filesystem     1K-blocks  Used Available Use% Mounted on
/dev/sda1         191284 16604    174681   9% /boot/efi
This example shows that /dev/sda1 is mounted at /boot/efi, which is a typical configuration. (The ESP can be on another disk or partition, but /dev/sda1 is the most common place for an ESP.) If your output shows /boot or / under the Mounted on column, then your ESP isn't mounted. (An exception is if you're mounting the ESP at /boot. This is an unusual configuration. If you're using it, you can proceed, making suitable adjustments to subsequent commands.) If you get a df: `/boot/efi': No such file or directory error message, then the /boot/efi directory doesn't even exist. In such cases, you may need to jump through some extra hoops, as described on my EFI Boot Loader Installation page.
Assuming the ESP is mounted at /boot/efi, you can install the rEFInd files as follows (you must be root to issue these commands, or precede each of them with sudo):
Note the use of doubled-up backslashes (\\) rather than forward slashes (/) in the directory separators when using efibootmgr. This command will work on most systems that are already booted into EFI mode; however, it won't work if you're booted in BIOS mode. You may also need to add options if your ESP is in some unusual location or if your system is unusual in some way. Consult the efibootmgr man page if you need help.
On some systems, efibootmgr won't do what you expect. On such systems, you may have better luck renaming the rEFInd files, as described in the Alternative Naming Options section.
Before installing rEFInd on a Mac, you must determine whether it uses a 32-bit or 64-bit EFI implementation. Most Intel-based Macs have 64-bit EFIs, so you should use the refind_x64.efi file with them; but very early Intel-based Macs have 32-bit EFIs (and sometimes 32-bit CPUs), which require the refind_ia32.efi file. You can determine whether your Mac needs the x86-64 or IA32 build by typing the following command in a Mac Terminal window:
$ ioreg -l -p IODeviceTree | grep firmware-abi
The result should include either EFI32 or EFI64, indicating that you should use the refind_ia32.efi or refind_x64.efi binary, respectively.
You should also be aware of your OS X version and installation options. If you used whole-disk encryption (WDE) or a logical volume for installation, you cannot install to the OS X root partition; you must install to the ESP or to a separate HFS+ partition. WDE became an option with OS X 10.7 and logical volumes are the default in OS X 10.10. If in doubt, proceed with an installation to the ESP or to a separate HFS+ partition.
The procedure for installing rEFInd on a Mac is similar to that for installing it under Linux, except that you must use the bless utility rather than efibootmgr to register the program with the firmware. Also, you'll probably have to mount your ESP manually, since that's not done by default under OS X. To be precise, you should follow these steps:
When you reboot, your Mac should bring up the rEFInd menu, and should continue to do so thereafter. If you make changes that break this association, you can re-run the bless command (if necessary, restoring the rEFInd files first). This might be necessary after installing system updates from Apple or if you upgrade rEFInd to a newer version.
If you're replacing rEFIt, you may discover that rEFInd works on the first boot, but the system reverts back to rEFIt or a direct boot to OS X on the second boot. To fix this problem, you can remove the rEFItBlesser program, which is located at /Library/StartupItems/rEFItBlesser. This program attempts to keep rEFIt set as the default boot loader, but it also has the purpose of protecting the computer from launching the wrong OS after waking from sleep. If you want that protection, my suggestion is to install rEFIt and rEFItBlesser and then replace the refit.efi file with refind_x64.efi or refind_ia32.efi (renaming it to refit.efi). Used in this way, rEFInd will still look for its own configuration file, refind.conf, so you'll need to move it but not rename it. If you don't move the icons from the rEFInd package, your icons will continue to look like rEFIt icons, and you'll be missing the new icons for specific Linux distributions that rEFInd provides. One final caveat: It's conceivable that rEFItBlesser is what's causing filesystem corruption for some users, so if you've been having this problem with rEFIt, it might be worth disabling this program and not using it with rEFInd.
If you want to remove rEFInd from your system, you can delete its files. The Mac will revert to booting using whatever standard boot loader it can find. Alternatively, you can use bless to bless another EFI boot loader. The GUI Startup Disk utility in System Preferences provides a simplified interface that enables you to select which OS X installation to boot, but it doesn't look for non-Apple boot loaders, so you can't use it to enable rEFInd.
Attempt this method of installation only on a UEFI-based PC; this method will not work on Windows that's installed on a Mac in BIOS/CSM/legacy mode. To install rEFInd under Windows, you must first find a way to access the ESP, which Windows normally hides from view. One way to accomplish this goal, and to proceed forward once the ESP is accessible, is as follows:
At this point, when you reboot, rEFInd should appear as your new default boot program. If it doesn't work for you, you have several other options, such as:
If you can't currently boot any OS (say, because a firmware update has wiped your NVRAM entries), you may find it convenient to install rEFInd using an EFI version 2 shell. Unfortunately, the bcfg command described here is not available in the EFI version 1 shell, and the version 2 shell is unusable on many firmware implementations prior to 2.3.1. Thus, this procedure won't work for all systems.
In addition to emergency situations, using bcfg can be desirable if efibootmgr or other OS-hosted tools don't do the job. This happens under VirtualBox, for instance. An alternative in such cases can be to use alternative names for rEFInd.
To begin, you must have a way to launch your shell. Unfortunately, this can pose a dilemma, since without rEFInd or some other boot manager, many EFI implementations lack the means to launch a shell. Some will do so, though, if the shell is stored as shellx64.efi (for x86-64) or shellia32.efi (for x86) in the root directory of the ESP. Thus, you can try copying your shell file there. You can obtain EFI 2 shells here:
Note that the IA32 shell included in rEFInd's CD-R image version is a version 1 shell, so you can't use it for this purpose. You can, however, copy rEFInd's files from the CD-R. You can even launch the version 1 shell included with rEFInd and then use that to launch a version 2 shell. The x86-64 shell on the CD-R is the alternate shell, which should work on any x86-64 computer. Once you've booted the shell, you can proceed as follows:
With any luck, rEFInd will start up at this point. If not, you can check your settings using a shell or an emergency system for your OS of choice. In an EFI shell, you might type bcfg boot dump -b to view your boot loader entries and verify that rEFInd appears at the top of the list. Be sure to check the pathname for typos. If you continue to have problems, you might look into giving rEFInd a fallback filename that your firmware will recognize.
Some EFI implementations do a poor job of honoring the boot options set via Linux's efibootmgr or other tools. You may also lack access to such utilities, such as if you must install rEFInd in Windows. In such cases, you may need to change the boot loader's name so that the EFI will see it as the default boot loader. rEFInd should then boot when your NVRAM lacks information on specific boot loaders to use. Broadly speaking, there are two alternative names that are most useful:
If you need to use one of these names, or something more exotic, you can do so in either of two ways: You can use the mvrefind.sh script to move your installation in one step, or you can move and rename your files manually.
The easiest way to move a rEFInd installation, at least in Linux, is to use the mvrefind.sh script. If you installed from one of my RPM or Debian packages, this script should be installed in /usr/sbin, so you can use it like a regular Linux command; otherwise you'll need to install it to your path yourself or type its complete path. Either way, it works much like the Linux mv command, but you pass it the directory in which a rEFInd installation appears and a target location:
# mvrefind.sh /boot/efi/EFI/BOOT /boot/efi/EFI/refind
This example moves rEFInd from /boot/efi/EFI/BOOT to /boot/efi/EFI/refind. It differs from mv in several ways:
The mvrefind.sh script is likely to be useful in resolving boot problems—if your system won't boot, you can try copying the installation to /boot/efi/EFI/BOOT, /boot/efi/EFI/Microsoft/Boot, and /boot/efi/EFI/refind in turn, testing the boot process after each attempt. (These filenames all assume your ESP is mounted at /boot/efi.) You could also copy a BIOS-mode install from /boot/efi/EFI/BOOT or /boot/efi/EFI/Microsoft/Boot to /boot/efi/EFI/refind to make it more robust against Windows repairs (assuming your firmware isn't broken).
You can move and rename rEFInd manually from any OS by following these steps:
When you reboot, rEFInd should come up. With any luck, it will detect your old boot loader as an option, if one was installed before.
If you've installed an earlier version of rEFInd, you can upgrade a bit more easily than you can install directly:
In all cases, if the new version includes new or altered configuration file options, you may need to manually update your configuration file. Alternatively, if you've used the default configuration file, you can replace your working refind.conf with refind.conf-sample from the rEFInd zip file. (When using install.sh, this file will be copied to rEFInd's installation directory under its original name, so you can rename it within that directory to replace the old file.)
If you're upgrading to rEFInd from rEFIt, you can simply run the install.sh script as described earlier or perform a manual installation. Once installed, rEFInd will take over boot manager duties. You'll still be able to launch rEFIt from rEFInd; a rEFIt icon will appear in rEFInd's menu. You can eliminate this option by removing the rEFIt files, which normally reside in /EFI/refit.
rEFInd includes the ability to launch any EFI program; however, rEFInd detects only certain programs. These include boot loaders in traditional locations and a handful of other programs. To launch most of these other programs, you must download and install them separately from rEFInd:
I've seen links to other versions of these tools from time to time on the Web, so if you try one of these programs and it crashes or behaves strangely, try performing a Web search; you may turn up something that works better for you than the one to which I've linked.
I've received a few reports of a sluggish boot process (a delay of about 30 seconds before starting rEFInd) on some Macs after installing rEFInd, as well as some other Mac-specific peculiarities. I've been unable to replicate thess problems myself, and their true causes remains mysterious to me. I have found several possible solutions, though: Using the --shortform option, using the fallback filename, moving rEFInd to an HFS+ volume, clearing NVRAM entries, fixing wake problems, and fixing a failure to find Linux.
Prior to version 0.8.5, these instructions and the install.sh script omitted the --shortform option from the bless command when installing rEFInd to the ESP. An rEFInd user, however, discovered that using the option eliminated the 30-second delay, so it is now the default with 0.8.5's install.sh, and is specified in the instructions. If you installed rEFInd 0.8.4 or earlier, you may want to re-install or re-bless rEFInd using this option.
There is one caveat, though: The man page for bless notes that --shortform notes that its use can come "at the expense of boot time performance." Thus, it's not clear to me that this option might not actually create problems on some computers. (It's eliminated the boot delay on my 2014 MacBook Air and has no detrimental effect on an old 32-bit Mac Mini that's never had a boot delay problem, though.) Thus, if you have problems with rEFInd 0.8.5, you might try running bless, as described in Installing rEFInd Manually Using OS X's step 8, but omit the --shortform option.
I've received a few reports that installing rEFInd to the ESP using the fallback filename (EFI/BOOT/bootx64.efi on most systems, or EFI/BOOT/bootia32.efi on very old Macs) can work around a sluggish boot problem. In fact, version 0.8.4's install.sh script copied the rEFInd binary to this name when run under OS X. (Version 0.8.5 switches to using --shortform with the more conventional EFI/refind/refind_x64.efi or EFI/refind/refind_ia32.efi name, as just noted.) If you installed to a name other than EFI/BOOT/BOOT{ARCH}, either manually or by using the 0.8.5 or later install.sh, renaming (and re-blessing) the installation is worth trying.
Most of the reports of sluggish Macintosh boots I've seen note that the user installed rEFInd to the ESP rather than to the OS X root partition. Some users have reported that re-installing rEFInd to the OS X root partition clears up the problem. This is obviously a straightforward solution to the problem, if it works. (This location is not an option when using WDE or OS X logical volumes.) Note that rEFInd can launch boot loaders that are stored on any partition that the EFI can read no matter where it's installed; therefore, you'll still be able to launch boot loaders stored on the ESP (or elsewhere) if you install it in this way.
A variant of this solution is to create a small (~100MiB) HFS+ volume to be used exclusively by rEFInd. You can then install rEFInd to that volume with the --ownhfs option to install.sh, as in ./install.sh --ownhfs /dev/disk0s6 if the volume is /dev/disk0s6. This approach has the advantage that it can be managed via OS X's own Startup Disk tool in System Preferences.
The biggest drawback to storing rEFInd on an HFS+ volume is that you won't be able to edit the rEFInd configuration file or move rEFInd-related binaries from an EFI shell if you install it in this way, since Apple's HFS+ driver for EFI is read-only. (The same is true of rEFInd's HFS+ driver, so it won't help you overcome this limitation.) You may also be limited in making changes to your rEFInd configuration from Linux or other OSes, too, since Linux's HFS+ drivers disable write support by default on volumes with an active journal. You can force write access by using the force option to mount; however, this procedure is noted as being risky in the Linux HFS+ documentation, so I don't recommend doing this on a regular basis on the OS X boot volume. This isn't as risky if you use a dedicated HFS+ rEFInd partition, though. You could even mount it as the Linux /boot partition, in which case it would also hold the Linux kernel and related files.
A variant of this solution is suggested in this blog post, which recommends placing rEFInd on an HFS+ volume on the first SATA channel. (In the blogger's case, that channel used to hold an optical drive, but that drive was replaced by a hard disk.)
Another possible solution is documented in a Web forum post. Be aware, though, that this procedure involves using the efibootmgr utility on Macs, which has been known to damage the firmware on some Macs. Other reports indicate that this problem has been fixed with 3.3.0 and later kernels. Thus, I present this information cautiously and with a strong "use at your own risk" warning. If you care to proceed, I recommend you update your Linux kernel to the latest possible version and then proceed as follows:
Some people have reported that installing rEFInd causes problems with resuming from a suspended OS X session. I know of two workarounds to such problems:
I've recently acquired a 2014 MacBook Air, but I haven't yet had the chance to try to reproduce this problem and find a workaround. It's on my to-do list, though.
Some users report that rEFInd doesn't detect Linux, or won't boot it when it is found. Broadly speaking, there are two common causes of this problem:
If you suspect that your hybrid MBR is damaged, you can try re-creating it with my GPT fdisk (gdisk) program. The GPT fdisk hybrid MBR documentation covers this procedure in detail. You can run gdisk from either OS X or Linux, although you may need to install it, particularly in OS X.
If you suspect driver problems, you'll need to mount your ESP (as described in the manual OS X installation instructions), locate the rEFInd drivers_x64 directory, and adjust its contents. Make sure you have a driver for the filesystem that holds your Linux kernel. If you don't know what filesystem this is, it's probably ext4fs. rEFInd ships with several filesystem drivers, including one for ext4fs. You should also remove unnecessary filesystem drivers. I've seen several reports of one driver interfering with others' operation. The biggest culprit seems to be the HFS+ driver when used on Macs.
Most Windows boot problems are best addressed on Windows-specific sites, so I recommend you make the rounds of Windows forums to solve such problems. There is one that deserves mention here, though: If you accidentally erase the Windows boot loader file, EFI/Microsoft/Boot/bootmgfw.efi, you won't be able to boot Windows. The simplest solution is to restore this file from a backup you prepared ahead of time. If you don't have such a backup, though, you can restore it as follows:
For more information, see this SuperUser question and answer.
If you decide you don't want to keep rEFInd, you can uninstall it. Doing so is a matter of removing the rEFInd files from your ESP (or from your OS X boot partition, if you installed the program there). The exact details of how to do this vary from one OS to another, though; and in some cases there are alternatives to completely uninstalling rEFInd that are easier to implement.
In Linux, a command like the following, typed as root, should remove rEFInd:
# rm -r /boot/efi/EFI/refind
You must type this command as root (or use sudo in some environments, such as under Ubuntu). This example assumes that your ESP is mounted at /boot/efi and that rEFInd is installed in EFI/refind on that partition. If you've mounted your ESP elsewhere, or installed rEFInd elsewhere, you should adjust the command appropriately.
If you installed via an RPM or Debian package in Linux, using your package manager will remove the package files, but not the files that the installer places on your ESP. Thus, you must uninstall those files manually, as just described. To complete the job, you'll also have to remove /boot/refind_linux.conf, and perhaps the /etc/refind.d directory.
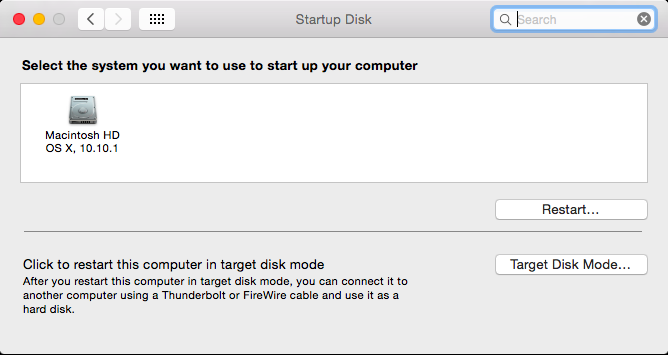
The easiest way to restore the standard OS X boot loader on a Mac is not to uninstall rEFInd; it's to bypass it. This can be accomplished with the Startup Disk item in the System Preferences panel:
Select your startup disk (Macintosh HD OS X, 10.10.1 in this example) and then click Restart. The computer should reboot into OS X, bypassing rEFInd.
I recommend stopping here, because the procedure for completely removing rEFInd from a Mac depends on your installation method and tends to be challenging for many Mac users, who are unfamiliar with the necessary command-line tools. Basically, you must reverse the steps described earlier, in Installing rEFInd Manually Using Mac OS X:
From Windows, you must reverse the directions for installing in Windows—type mountvol S: /S to mount your ESP as S:, then navigate to the S:\EFI directory and delete the refind subdirectory.
On a UEFI-based PC, when the computer boots and cannot find the rEFInd files, it should move on to the next boot loader in its list. In my experience, some EFI firmware implementations remove boot loaders they can't find from their NVRAM lists, so nothing else will be required, provided you have another working boot loader in your firmware's list. If your firmware doesn't automatically clean up its NVRAM entries, rEFInd's entry will do little harm; however, you can delete it with the efibootmgr utility in Linux:
# efibootmgr --verbose
Timeout: 10 seconds
BootOrder: 0000,0007
Boot0000* rEFInd	HD(2,1b8,64000,f1b7598e-baa8-16ea-4ef6-3ff3b606ac1e)File(\EFI\refind\refind_x64.efi)
Boot0007* CD/DVD Drive	BIOS(3,0,00)PATA: HP DVD Writer 1040r     .
# efibootmgr --delete-bootnum --bootnum 0000
Timeout: 10 seconds
BootOrder: 0007
Boot0007* CD/DVD Drive
This example shows use of efibootmgr's --verbose (-v) option to display boot programs so as to identify which one is rEFInd, followed by --delete-bootnum (-B) to delete a boot program and --bootnum (-b) to identify which one to delete. Of course, in this example there's not much else left, so you'd presumably want to install another boot program at this point! If you already have another one installed, you may want to check the BootOrder line to determine which one will take precedence when you reboot. If you don't like what it shows, you can adjust it with the --bootorder (-o) option; consult efibootmgr's man page for details.
If you're not using Linux, you may be able to find a utility that serves a similar function. Under Windows, the bcdedit command, described in the section on installing rEFInd under Windows, may work, although I've not attempted this.
copyright © 2012–2015 by Roderick W. Smith
This document is licensed under the terms of the GNU Free Documentation License (FDL), version 1.3.
If you have problems with or comments about this Web page, please e-mail me at rodsmith@rodsbooks.com. Thanks.
Comments on rEFInd and OS X 10.10 (Yosemite)
Return to my main Web page.