by Roderick W. Smith, rodsmith@rodsbooks.com
Originally written: 3/14/2012; last Web page update: 5/25/2012, referencing rEFInd 0.4.1
I'm a technical writer and consultant specializing in Linux technologies. This Web page is provided free of charge and with no annoying outside ads; however, I did take time to prepare it, and Web hosting does cost money. If you find this Web page useful, please consider making a small donation to help keep this site up and running. Thanks!
| Donate $1.00 | Donate $2.50 | Donate $5.00 | Donate $10.00 | Donate another value |
This page is part of the documentation for the rEFInd boot manager. If a Web search has brought you here, you may want to start at the main page.
With rEFInd in place and added to your firmware's list of boot utilities, you can reboot your computer. Depending on your configuration, rEFInd may come up immediately or you may need to select it from your firmware's boot options or reconfigure your firmware to present rEFInd automatically. Unfortunately, I can't offer much specific advice on this score, since EFI implementations differ so much in their user interfaces.
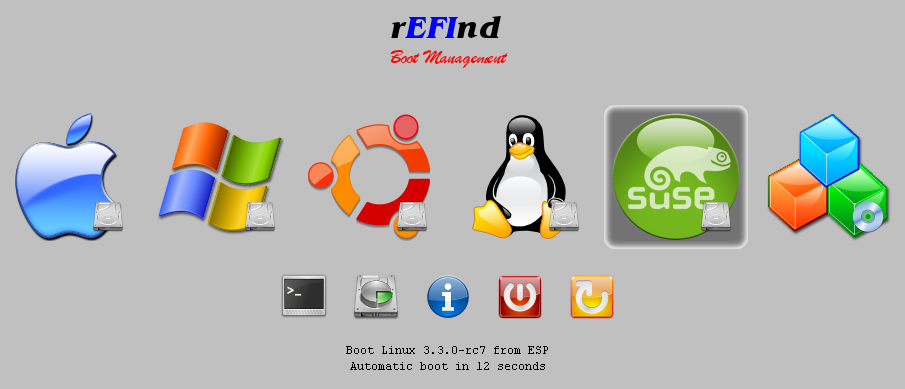
Assuming rEFInd starts up correctly, you should see its main screen, which resembles the following:
If you don't press any key before the timeout (shown on the last line) expires, the default boot loader will launch. This is normally the first item in the menu, but you can adjust the default by editing the configuration file. (In this example, it's the SUSE loader, which is further identified by text above the timeout as Linux 3.3.0-rc7 from ESP.)
This display is dominated by the central set of OS tags (icons), which in this example includes tags for OS X, Windows, Ubuntu, a generic Linux installation (ELILO, in fact), SUSE, and an unkown boot loader. All but the last of these are on hard disks, but the unknown boot loader is on an optical disc, as revealed by the small icons (known as badges) in the lower-right corner of the OS icons.
In this example, the SUSE tag is selected. You can move the selection left by pressing the left arrow key and right by pressing the right arrow key. If your system has many boot loaders, an arrow icon will appear to the right of the boot loader list, indicating that the boot loader list will scroll when you move off the right edge. If you do this, an arrow icon will appear to the left of the icon list, indicating that you can scroll back in a similar manner. You can scroll the list by one line full of icons by using the Page Up or Page Down keys to move left and right, respectively. Moving past the final selection or using the down arrow key moves the selection to the second row of small tags, which launch ancillary programs or perform special actions. If you've moved the selection cursor to the second row, pressing the up arrow key or scrolling past the left edge of the second row moves the cursor to the top row. In this figure, these five tags are present:
The last three of these options are always available by default, but the first depends on the presence of the EFI shell program file, as described earlier. To get the gptsync icon, you must install gptsync.efi and adjust the showtools option in refind.conf, as well.
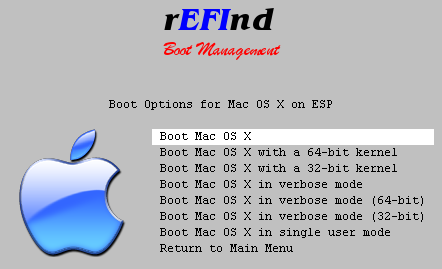
To launch an OS or utility, you should select its tag and then press the Enter key. If you press the Insert key, rEFInd will show a menu that may hold additional options, depending on the OS type. The following figure shows the submenu for Mac OS X. You can use this menu much like the main menu; move the cursor to select the option you want to use, then press the Enter key to launch the boot loader with the selected options. Press the Esc key or select Return to Main Menu to return to the main menu.
Ordinarily, rEFInd displays tags for OSes it finds on internal hard disks, external hard disks (including USB flash drives, CF disks, and so on), and optical discs. Sometimes, though, the firmware hasn't had time to fully examine these devices by the time rEFInd starts; or you might only insert or plug in the media after rEFInd appears. In these cases, you can press the Esc key to have rEFInd re-read its configuration file and re-scan your media for boot loaders. This action can take a few seconds to complete, so be patient. You can also use this feature to detect OSes if you launch a shell and use it to load a driver or edit the refind.conf file.
Although most rEFInd features can be activated via fairly obvious keyboard actions, some are not obvious. Table 1 summarizes the keystrokes that rEFInd accepts, and the action that each keystroke invokes.
| Keystroke | Explanation |
|---|---|
| left arrow | Moves the selection one icon to the left (or up the list in text mode) |
| right arrow | Moves the selection one icon to the right (or down the list in text mode) |
| up arrow | Moves the selection from the utilities row to the OS row (in text mode, moves up one entry) |
| down arrow | Moves the selection from the OS row to the utilities row (in text mode, moves down one entry) |
| Page Up | Scrolls the visible set of tags to the left (or up in text mode) |
| Page Down | Scrolls the visible set of tags to the right (or down in text mode) |
| Home | Moves the selection to the first item on the OS row |
| End | Moves the selection to the last item on the utilities row |
| Esc | Returns from a sub-menu; on the main screen, re-reads the configuration file and re-scans for boot loaders |
| Insert, F2, or + | Opens the selection's submenu, which is most useful with Mac OS X, ELILO, and Linux kernels with EFI stub loader support |
| F10 | Saves an image of the current screen in the file screenshot.bmp in the ESP's root directory |
| F12 or (on some keyboards) Eject | Ejects removable media. This feature only works on some Macs, not on UEFI-based PCs. |
| Enter or spacebar | Launches the currently-selected OS, utility, or built-in feature |
| 1 through 9 | Launches the specified boot loader by number |
| A | Displays the "About rEFInd" information |
| E | Launches the first instance of ELILO in the boot list |
| G | Launches the first instance of GRUB in the boot list |
| L | Launches the first Linux kernel in the boot list |
| M | Launches the first Mac OS boot loader in the boot list |
| P | Launches gptsync |
| S | Launches an EFI shell, if available |
| U | Shuts down the computer (but note that this is buggy and reboots most UEFI-based PCs) |
| W | Launches the first Windows boot loader |
| Other letters | Launch OSes whose names begin with those letters, as described below |
rEFInd assigns shortcut letters to most OS entries based on the first letter of the directory in which the OS's boot loader is stored. For instance, if you have a boot loader called /EFI/debian/elilo.efi, rEFInd attempts to assign it a shortcut letter of D. rEFInd overrides this default for Mac OS X, Windows, and for Linux's GRUB, ELILO, and EFI stub boot loaders if the distribution can't be more precisely identified, as noted in the preceding table. This method works well for many installations, but it can produce conflicts. For instance, if you have a Macintosh that holds both Mac OS X and Mandriva, both OSes would normally use the M shortcut key. In practice, which works depends on the order in which rEFInd detects the OSes.
copyright © 2012 by Roderick W. Smith
This document is licensed under the terms of the GNU Free Documentation License (FDL), version 1.3.
If you have problems with or comments about this Web page, please e-mail me at rodsmith@rodsbooks.com. Thanks.
Return to my main Web page.